
1. Principle
Suppose there’s an APP that wants me to use GitHub for authorized login. In this login scenario:
I, as the data owner, tell the system (GitHub) that I agree to authorize a third-party application (App) to enter the system and obtain certain data (my ID, avatar, etc.). The system then generates a short-term access token to replace the password for the third-party application (APP) to access the data.
The token is valid for a short time, and I can revoke it through GitHub at any time, making the APP unable to access my ID/avatar and other information.
There are four roles: user, application, system, and resource.
The user is the resource owner, the application is the resource consumer, and the system is the resource manager. In real life, the application and system each have one instance, while users have multiple instances. The application and system communicate through the OAuth2 protocol, with the user participating in the process (authorization).
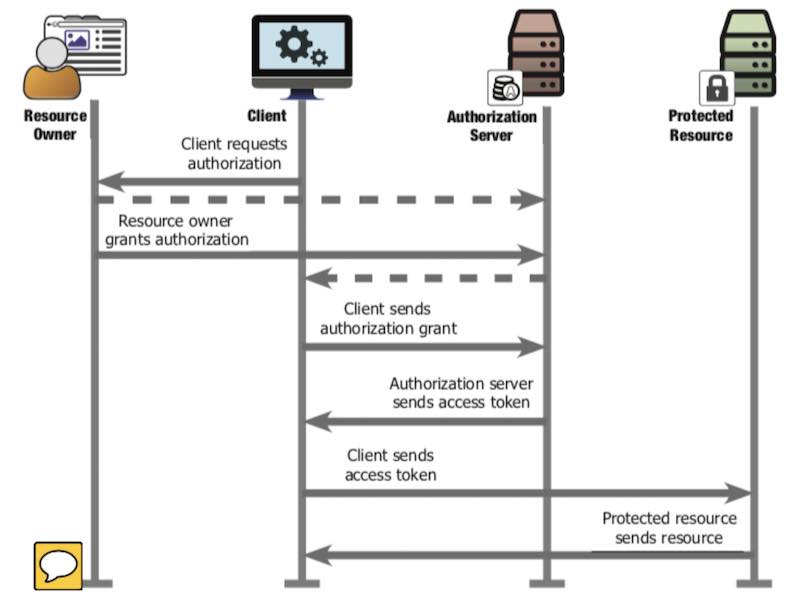
Mapping the sequence diagram above to a real-life scenario, where an owner authorizes a courier company to enter the community to deliver packages:
- Client Req Auth:
- The SF Express courier calls the owner, there’s a package for you, needs to be delivered in, let’s get a pass
- Resource Owner Grant Auth:
- Owner contacts the property management: I’m the owner, here’s my proof, I allow SF Express to enter the community to deliver packages for me in the next two days
- Property tells owner: OK, have SF Express contact me for the temporary pass, room 201 building 3, authorization code: nucleic acid test benefits the country
- Client Sends Auth Grant
- Courier company contacts property: I’m SF Express, here’s my proof, need to deliver to room 201 building 3, owner’s authorization code is nucleic acid test benefits the country
- Auth Server Sends Access Token
- Property says: authorization code is good, here’s the temporary pass, valid for two days
- Clients Sends Access Token
- Courier uses temporary pass to open the community gate
- Protected Resource sends resource
- Courier enters the community
Note:
- In step 2, when owner contacts property, must prove they’re actually the owner (via community app login)
- In step 3, when SF Express contacts property, needs to prove they’re actually SF Express (report the client_secret pre-assigned by property). Property also needs to check that the owner of room 201 building 3 actually allowed it (via authorization code check).
If the courier goes directly to the guard and says “nucleic acid test benefits the country,” it won’t work. The information carried by “nucleic acid test benefits the country” is that the owner of room 201 building 3 allowed SF Express to enter the community within 2 days. The courier reporting this authorization code to the guard is useless - the guard only recognizes the pass. Besides, the guard doesn’t know if the courier is from SF Express. The authorization code is only useful after the courier company exchanges it for a temporary pass. Exchanging for a temporary pass requires verifying SF Express’s identity. The information carried by “nucleic acid test benefits the country” can be public - if others hear it, there’s no security risk because others don’t have the client_secret that SF Express registered with the property, so they can’t exchange the authorization code for a temporary pass. The temporary pass must be kept safe - anyone with it can enter the community.
The OAuth2 process is: when there’s a package, the owner authorizes the property to assign a temporary pass to the courier company, which can enter the community within a certain time. At the same time, there will be many valid temporary passes authorized by different owners, but for one owner to one courier company, there’s only one valid temporary pass at any given time.
| Chinese Term | Sequence Diagram Concept | GitHub Login APP Scenario | Owner Authorizes SF Express to Enter Community |
|---|---|---|---|
| User | Resource Owner | GitHub User | Owner |
| Application | Client | GitHub OAuth APP | SF Express |
| System | Authorization Server | GitHub | Property Management |
| Resource | Protected Resource | GitHub username, avatar | Community roads |
| Authorization | Authorization Grant | code | Nucleic acid test |
| Token | Access Token | token | Temporary pass |
The diagram below is from RFC6750. For actual implementation, Client is the APP, Auth Server/Resource Server are on the same domain (GitHub, DingTalk, Facebook…), and Resource Owner also completes authorization (Auth Grant) on that domain.
For discussion convenience, “obtaining user authorization” is abbreviated as “getting code,” and “obtaining access token” is abbreviated as “getting token.”
Next, using GitHub and DingTalk as OAuth servers, we’ll analyze the message formats in the process of getting code, getting token, and reading user info. No coding needed - just need a browser and REST Client (POSTMAN, CURL, or VSCode plugin).
There are two types of OAuth clients:
- Public: Clients that don’t have the ability to store secret keys securely - like desktop software, mobile apps, single-page applications (SPA).
- Confidential: The step of exchanging code for access_token is done on the backend. Generally protected with client_secret. We’ll mainly discuss confidential clients.
2. GitHub OAuth Interaction Analysis
The following four steps demonstrate:
- Creating a new OAuth app on GitHub
- Getting authorization code through GitHub’s API
- Getting token through GitHub’s API
- Getting authorized user data through GitHub’s API
Recording key input/output parameters for each step.
2.1. Create OAuth APP
After logging into GitHub, create a new OAuth APP in the development options. For testing convenience, I set Redirect URL to https://www.baidu.com/. The new APP configuration is:
2.2. Get code
In browser, initiate:
You’ll see:
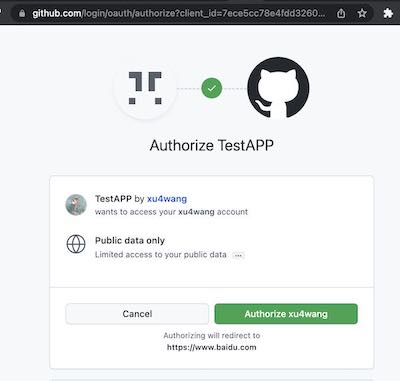
After selecting authorize, you can see the Code in the callback:
2.3. Get token
The request has three parameters:
- client_id: obtained from creating the app on GitHub
- client_secret: obtained from creating the app on GitHub
- code: obtained from previous Authorization step
In the response:
Now in the GitHub app configuration, you can see that the app has one user. And I can Revoke All user tokens.
2.4. Read User Info
In the response:
{
  "login": "xu4wang",
  "id": 311397,
  "node_id": "MDQ6VXNlcjMxMTM5Nw==",
  "avatar_url": "https://avatars.githubusercontent.com/u/311397?v=4",
  "gravatar_id": "",
  "url": "https://api.github.com/users/xu4wang",
  "html_url": "https://github.com/xu4wang",
  "followers_url": "https://api.github.com/users/xu4wang/followers",
  "following_url": "https://api.github.com/users/xu4wang/following{/other_user}",
  "gists_url": "https://api.github.com/users/xu4wang/gists{/gist_id}",
  "starred_url": "https://api.github.com/users/xu4wang/starred{/owner}{/repo}",
  "subscriptions_url": "https://api.github.com/users/xu4wang/subscriptions",
  "organizations_url": "https://api.github.com/users/xu4wang/orgs",
  "repos_url": "https://api.github.com/users/xu4wang/repos",
  "events_url": "https://api.github.com/users/xu4wang/events{/privacy}",
  "received_events_url": "https://api.github.com/users/xu4wang/received_events",
  "type": "User",
  "site_admin": false,
  "name": "Austin",
  "company": null,
  "blog": "https://awis.me",
  "location": "Shenzhen, China",
  "email": "[email protected]",
  "hireable": null,
  "bio": "Working @ Bangkok , Beijing and Shenzhen",
  "twitter_username": null,
  "public_repos": 26,
  "public_gists": 1,
  "followers": 10,
  "following": 17,
  "created_at": "2010-06-22T05:35:32Z",
  "updated_at": "2022-02-25T18:51:48Z"
}
From a security implementation perspective, applying for Token can be done between the backend and GitHub. This way, the final Token won’t appear on the frontend.
- Authorization Request happens between browser and GitHub, getting Access Code (authorization code) is redirected by GitHub, which the browser gets.
- Client Secret can be stored only on the backend, so even if the frontend gets the Access Code, it can’t call the API to get the Token from GitHub.
The frontend uses client_id to request an access code that the app can use, then the backend uses client_secret and access code together to apply for a token. This two-step design satisfies the requirement of using frontend for user authorization while also keeping the token hidden from the frontend, enhancing security.
3. DingTalk OAuth Interaction Analysis
On DingTalk, except for needing to configure OAuth app and add two permissions for reading personal info, other processes are similar to GitHub.
3.1. Create OAuth APP
In DingTalk Developer Center, create an H5 internal enterprise app. And authorize it to read personal phone number and contact info.
3.2. Get code
When getting code on DingTalk, there can be a corpId parameter to specify which organization’s user.
3.3. Get token
POST https://api.dingtalk.com/v1.0/oauth2/userAccessToken
Content-Type:application/json

{
  "clientId" : "ding your id",
  "clientSecret" : "your secret",
  "code" : "6b427e8bfab83e93bedd13f16a430702",
  "grantType" : "authorization_code"
}

Gets:

{
  "expireIn": 7200,
  "accessToken": "a8f4e3215a703ce9a7164e91dbab53c0",
  "refreshToken": "b13e5a61b421342d95d86c9e64c275c6"
}
3.4. Read User Info
GET https://api.dingtalk.com/v1.0/contact/users/me
x-acs-dingtalk-access-token:a8f4e3215a703ce9a7164e91dbab53c0
Content-Type:application/json

Gets:

{
  "nick": "AWIS ME",
  "unionId": "D578iS5hxxxx",
  "avatarUrl": "https://static-legacy.dingtalk.com/media/lADPGT5i9m5ZyXDNA4LNAtA_720.jpg",
  "openId": "WySPOpXqxE",
  "mobile": "1350xxxxxxxx",
  "stateCode": "86",
  "email": "[email protected]"
}
3.5. About Standard Compatibility
In DingTalk’s OAuth 2 implementation, many parameter names differ from RFC6749 definitions. For example, code is called authCode in DingTalk, client_id is called clientId, grant_type is renamed to grantType, etc. Incompatibility with the standard means generic OAuth libraries (like openid-client) can’t directly integrate with DingTalk. This non-standard protocol design causes software to be non-reusable, wasting social resources, and should be despised.
4. PKCE
OAuth 2.0 public clients utilizing the Authorization Code Grant are susceptible to the authorization code interception attack. This specification describes the attack as well as a technique to mitigate against the threat through the use of Proof Key for Code Exchange (PKCE, pronounced “pixy”).
PKCE is an extension of OAUTH2, originally intended to solve security issues for public clients (like browsers or app apps). But later recommended for the confidential clients described above.
The basic principle is when getting code in the first step, additionally pass two more parameters to the auth server:
- code challenge
- code challenge method
Where:
And code verifier is a random string.
After receiving the request, the server saves code challenge and code_challenge_method, then issues the code.
Next, when exchanging code for token, the client gives the code verifier and code to the server together. This allows the server to verify if the client exchanging for token is the same as the one that originally requested the code.
This way, even if malicious program intercepts the authorization code, without code_verifier, they can’t get the access token.
PKCE can also be used for confidential (confidential) clients - that’s client_secret + code_verifier double key.
If OAuth2 only has client_secret without PKCE, there’s also a risk of user identity impersonation.
The attack principle is: a third party uses a browser plugin to get the code, then makes the victim’s OAuth flow fail, while using the stolen code to impersonate the victim to log in. With PKCE, the victim’s browser has code_verifier, which won’t be stolen along with the code (it’s not transmitted over the network before exchanging for token), so the attacker can’t impersonate the victim on the API server even with the code.