
1. 原理
假设有一个APP,要我使用GitHub授权登录。 在这个登录场景中:
我作为数据的所有者告诉系统(GitHub),同意授权第三方应用(App)进入系统,获取某些数据(我的ID,头像等)。系统从而产生一个短期的进入令牌(token),用来代替密码,供第三方应用(APP)访问数据使用。
token是短期有效的,我可以随时通过GitHub把这个Token注销,从而使得APP不再能访问我的ID/头像等信息。
这里面有四个角色:用户,应用,系统,资源。
用户是资源所有者,应用是资源的使用者,系统是资源管理者。 现实生活中, 应用和系统各自有一个实例, 用户有多个实例。 应用和系统之间通过OAuth2协议通信。 用户在通信过程中参与(授权)。
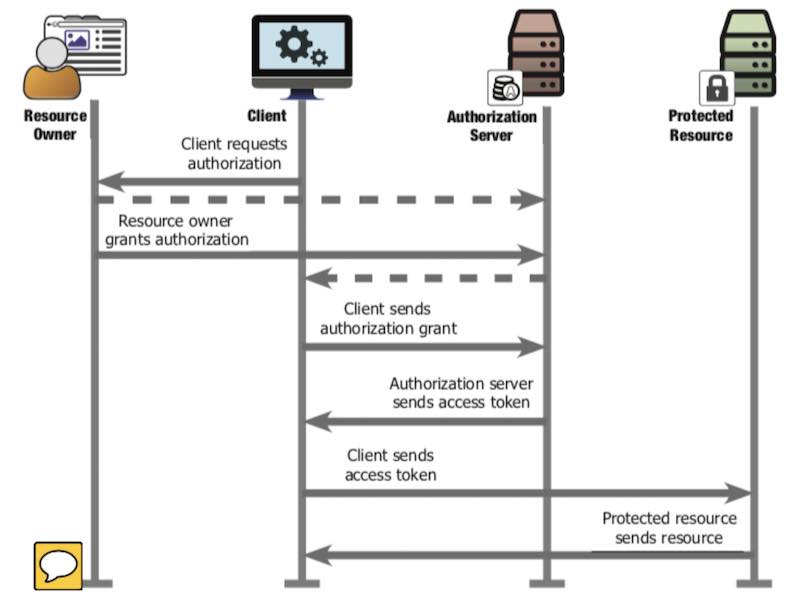
把上面时序图对应到一个生活中的场景,业主授权快递公司出入小区送快递:
- Client Req Auth:
- 顺丰快递员打电话给业主,有你的快递,得送进去,给办个出入证吧
- Resource Owner Grant Auth:
- 业主联系小区物业, 我是业主,这是我的证明,我允许顺丰最近两天可以进小区物业给我送快递
- 小区物业告诉业主,OK,你让顺丰联系我拿临时出入证,就说3号楼201房间,授权码:核酸检测利国利民
- Client Sends Auth Grant
- 快递公司联系小区物业说,我是顺丰,这是我的证明,需要给3号楼201房间送快递,业主的授权码是核酸检测利国利民
- Auth Server Sends Access Token
- 小区物业说好,授权码没问题,这个是临时出入证,两天有效。
- Clients Sends Access Token
- 快递员用临时出入证开小区大门
- Protected Resoure sends resource
- 快递员进入小区
注意:
- 第二步,业主联系物业时候, 要证明自己的确是业主(用小区app登录)
- 第三步,顺丰联系物业时候,需要证明自己的确是顺丰(报小区物业预先给顺丰分配的client_secret让物业核对). 物业还要检查3号楼201业主的确允许了(通过查授权码)。
如果快递员直接到小区门卫那里说 “核酸检测利国利民”,是没有作用的。“核酸检测利国利民”承载的信息是3号楼201业主允许顺丰在2天内进小区。 快递员给门卫报这个授权码没用,门卫只认出入证。再说,门卫也不知道快递员是不是顺丰的啊。这个授权码只有在快递公司把它换成临时出入证后才可以进小区。 换临时出入证需要验证顺丰的身份。“核酸检测利国利民”承载的信息是可以公开的,其它人听到了也不会有安全风险,因为其他人没有顺丰在物业处注册得到的client_secret, 没办法用授权码换临时出入证。 临时出入证需要妥善保管,任何人拿着都能进小区了。
OAuth2的过程是当有快递时候,业主授权小区物业给快递公司分配临时出入证,在一定的时间内可以出入小区。在同一时间,会存在很多个不同业主授权的有效临时出入证,但一个业主对一家快递公司,在同一时间只有一个有效临时出入证。 角色间的类比关系如下。
| 中文术语 | 时序图中的概念 | GitHub授权登录APP场景 | 业主授权顺丰进小区场景 |
|---|---|---|---|
| 用户 | Resource Owner | GitHub用户 | 业主 |
| 应用 | Client | GitHub OAuth APP | 顺丰 |
| 系统 | Authorization Server | GitHub | 小区物业 |
| 资源 | Protected Resource | GitHub用户名称,头像 | 小区内部道路 |
| 授权 | Authorization Grant | code | 核酸检测利国利民 |
| 令牌 | Access Token | token | 临时出入证 |
下图出自RFC6750, 实际实现时候,Client是APP, Auth Server/Resource Server在同一个域名后面(GitHub,钉钉,Facebook…), Resource Owner也是在这个域名下完成授权(Auth Grant)。
为讨论方便, 以下将获取用户授权简称为“获取code”, 将获取访问令牌(Access Token)简称为“获取Token”。
接下来分别使用GitHub和钉钉作为OAuth服务器,来解析获取code,获取token以及读取用户信息过程中的消息格式。全程不需要写代码,需要用浏览器和REST Client(POSTMAN, CURL或者Vscode的插件都可以)。
OAUTH 客户端有两种:
- public:客户端本身没有能力保存密钥信息,比如桌面软件,手机App,单页面程序(SPA)。
- confidential : 通过code换取access_token这一步是在后端的api完成。一般用client_secret保护。 我们主要讨论confidential类客户端。
2. GitHub OAuth交互解析
以下四个步骤,示例了:
- 在GitHub建立了一个新的OAuth应用,
- 通过GitHub提供的API获取授权吗,
- 通过GitHub提供的API获取token,
- 通过GitHub提供的API获取授权用户的数据。
记录了每一步的关键输入输出参数。
2.1. 创建OAuth APP
登录GitHub后,在开发选项中建立一个新的OAuth APP,为测试方便,我将Redirect URL设置成了 https://www.baidu.com/. 得到的新APP配置信息是:
2.2. 获取code
在浏览器发起:
出现:
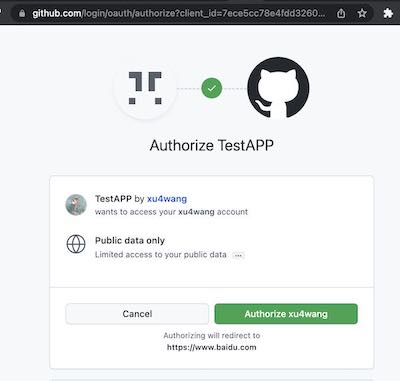
选择授权后,在回调中可以看到Code
2.3. 获取token
上面请求有三个参数:
- client_id : 在GitHub创建应用得到的
- client_secret : 在GitHub创建应用得到的
- code : 上一步Authorization得到的
得到响应中:
这时候登录GitHub在创建的应用配置界面,能够看到该应用已经有一个用户了。 并且我可以Revoke All user tokens。
2.4. 读取用户信息
得到响应中
{
  "login": "xu4wang",
  "id": 311397,
  "node_id": "MDQ6VXNlcjMxMTM5Nw==",
  "avatar_url": "https://avatars.githubusercontent.com/u/311397?v=4",
  "gravatar_id": "",
  "url": "https://api.github.com/users/xu4wang",
  "html_url": "https://github.com/xu4wang",
  "followers_url": "https://api.github.com/users/xu4wang/followers",
  "following_url": "https://api.github.com/users/xu4wang/following{/other_user}",
  "gists_url": "https://api.github.com/users/xu4wang/gists{/gist_id}",
  "starred_url": "https://api.github.com/users/xu4wang/starred{/owner}{/repo}",
  "subscriptions_url": "https://api.github.com/users/xu4wang/subscriptions",
  "organizations_url": "https://api.github.com/users/xu4wang/orgs",
  "repos_url": "https://api.github.com/users/xu4wang/repos",
  "events_url": "https://api.github.com/users/xu4wang/events{/privacy}",
  "received_events_url": "https://api.github.com/users/xu4wang/received_events",
  "type": "User",
  "site_admin": false,
  "name": "Austin",
  "company": null,
  "blog": "https://awis.me",
  "location": "Shenzhen, China",
  "email": "[email protected]",
  "hireable": null,
  "bio": "Working @ Bangkok , Beijing and Shenzhen",
  "twitter_username": null,
  "public_repos": 26,
  "public_gists": 1,
  "followers": 10,
  "following": 17,
  "created_at": "2010-06-22T05:35:32Z",
  "updated_at": "2022-02-25T18:51:48Z"
}
从实现的安全性角度考虑,申请Token可以在后台和GitHub之间。 这样最终得到的Token不会在前端出现。
- Authorization Request 在浏览器和GitHub之间进行,得到Access Code(授权码)是GitHub Redirect过来的,浏览器会拿到。
- 可以将Client Secret只在后台保存,所以前端即便得到Access Code,也没办法自己调用API来从GitHub得到Token。
前端用client id请求到了该应用可以用的access code, 后端再用client secret和access code一起申请token。 通过两步申请的设计,即满足了必须用前端做用户授权的需求,又做到了token不暴露给前端,增强了安全性。
3. 钉钉 OAuth交互解析
在钉钉上,除了需要配置OAuth应用,增加两个读取个人信息的权限外,其它流程和GitHub类似。
3.1. 创建OAuth APP
在钉钉开发者中心,创建H5企业内部应用。并且授权它有读取个人手机号,个人通讯录信息的权限。
3.2. 获取code
钉钉在获取code时候,可以有一个corpId参数,用来指定是那个组织的用户。
3.3. 获取token
POST https://api.dingtalk.com/v1.0/oauth2/userAccessToken
Content-Type:application/json

{
  "clientId" : "ding your id",
  "clientSecret" : "your secret",
  "code" : "6b427e8bfab83e93bedd13f16a430702",
  "grantType" : "authorization_code"
}

得到:

{
  "expireIn": 7200,
  "accessToken": "a8f4e3215a703ce9a7164e91dbab53c0",
  "refreshToken": "b13e5a61b421342d95d86c9e64c275c6"
}
3.4. 读取用户信息
GET https://api.dingtalk.com/v1.0/contact/users/me
x-acs-dingtalk-access-token:a8f4e3215a703ce9a7164e91dbab53c0
Content-Type:application/json

得到:

{
  "nick": "AWIS ME",
  "unionId": "D578iS5hxxxx",
  "avatarUrl": "https://static-legacy.dingtalk.com/media/lADPGT5i9m5ZyXDNA4LNAtA_720.jpg",
  "openId": "WySPOpXqxE",
  "mobile": "1350xxxxxxxx",
  "stateCode": "86",
  "email": "[email protected]"
}
3.5. 关于和标准的兼容性
钉钉的OAuth 2实现中, 其很多参数名称和RFC6749中的定义不一致。 例如code在钉钉中叫做authCode,client_id在钉钉中叫做clientId,grant_type被重命名为grantType,… 和标准不兼容会导致通用的OAuth库(例如openid-client)无法直接和钉钉互通。这种不兼容的协议设计导致软件无法重用,社会资源浪费,应该被鄙视。
4. PKCE
OAuth 2.0 public clients utilizing the Authorization Code Grant are susceptible to the authorization code interception attack. This specification describes the attack as well as a technique to mitigate against the threat through the use of Proof Key for Code Exchange (PKCE, pronounced “pixy”).
PKCE 是OAUTH2的一个扩展, 其本意是解决public client(例如浏览器或者app应用)的安全性问题。 但后来对于我们上面描述的confidential类客户端也推荐使用。
其基本原理是在第一步获取code时候, 额外多传给auth server两个参数:
- code challenge
- code challenge method
其中,
而code verifier是一个随机串。
服务器在收到请求后,会保存 code challenge和 code_challenge_method, 然后发放code。
接下来, 用code换取token时候, 客户端把 code verifier 和code一起给服务器。 这样服务器就可以验证换取token的这个客户端和最初申请code的客户端是不是一个。
这样,就算恶意程序拦截到了授权码code,但是没有code_verifier,也是不能获取访问令牌的。
PKCE也可以用在机密(confidential)的客户端,那就是client_secret + code_verifier双重密钥了。
如果OAUTH2只有client_secret而没有PKCE,也存在用户身份被冒名顶替的风险。
攻击的原理是第三方使用浏览器插件,获取到code之后,让受害者的OAuth流程失败, 同时用盗窃的code来顶替受害者登录。 如果有了PKCE,受害者浏览器有code_verifier, code_verifier不会和code同时失窃(在获取token之前不会在网络上传输), 所以攻击者拿到code也无法直接通过API服务器来冒充受害者。